After I started to use Mac OS one problem was constantly annoying me.
iTunes would not properly interpret mp3 tag info of my Russian songs, that I had to copy from my old Windows XP machine.
Instead of the song name in Cyrillic i would see a pseudo-Unicode gibberish. I tried to reimport, tried to rewrite iTunes library file.
Nothing would work. Luckily, after a long search online I have found a reference to the Unicode Rewriter on one of the Mac Os Hints (link) forums.
This java program worked beautifully. Check it out.
Tuesday, July 26, 2005
They've Done It Again! Yet another poorly designed service from Microsoft.
I am going into the deeper examination of a new Microsoft service - MSN Virtual Earth. After playing with it for a while yesterday and today I came to the firm conclusion that it's just yet another poorly designed product/service with no other reason to exist but to show them (Google Maps) that Microsoft can make draggable web maps too.
User interface is awful, map's behavior is disgusting - it literally runs away from you, some areas of the map are blacked out and you need to reload the page to see them.
Scratch pad is absolutely useless other than for jumping from one place to another. You cannot, for example use the items in your scratch pad to create a route and driving directions. If you click a Drive To or Drive From Link in the small pop-up place tag (that is of course if you are able to keep that pop-up up at all), you are send to the different web page (maps.msn.com). And guess what, you will need to enter the Start or Finish address all over again even if you have it in your scratch pad on MSN Virtual Earth. After you do that, the directions are shown not on the MSN Virtual Earth map, but on the handicapped maps.msn.com.
When using the Google Maps you are always in the same window, on the same page, and if you chose to find the driving directions and click From here or To here in the pop-up location tag, you'll actually be able to enter the destination address right there, and see the results eight on the draggable Google Maps with all of the benefits of the satellite imagery and street overlay graphics (that are pretty accurate I might add).
So, yes, MSN Virtual Earth has higher resolution of the outdated satellite photos, but Google offers a pleasant user experience of a product/service that actually works.
Yay!- maps.google.com; Boo!- MSN Virtual Earth.
Monday, July 25, 2005
Plane lift-off in SFO on MSN Earth
So here we can see a plane lifting-off in all of it high resolution glory.
Sunday, July 24, 2005
MSN Virtual Earth Vs. Google Maps
The Microsoft answer to the Google Maps is finally here.
I won't go into the usability and features exploration here but will concentrate on the quality of maps instead.
Interestingly enough, even though the map data provider for both services is the same - NAVTEQ, MSN Virtual Earth has a lower scale, showing more detail of the terrain than the Goggle Maps or the Google earth. Microsoft offers at least three times higher resolution than the Google Maps.
That said, Google has a better overlay alignment of the graphic maps over the satellite image. The map and the image actually match, whereas the MSN Virtual Earth has a little problem with it. The graphics of the streets are crude and do not align with the photo imagery of those streets.
This is pretty much it.
Tuesday, July 19, 2005
Practical side to the AdobeRGB versus ProPhoto RGB discussion.
After reading the mentioned article I have decided to find all the truth about it myself. I used an image I took last year in San Juan, Puerto Rico as a test dummy.
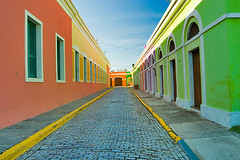
to purchase this print please click here
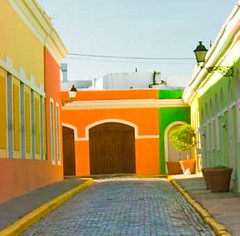
I converted this image from a CRW file format as a 16-bit ProPhoto RGB image using the Adobe Photoshop Camera Raw. Then I saved it as a PSD file and resaved as a copy after a conversion to AdobeRGB using the Adobe ACE with relative colormetric and a black point compensation.
After opening both 16-bit files inside the ProPhotoRGB color space and pasting the AdobeRGB tagged file as a layer into the ProPhotoRGB tagged image I switched a blending mode of the pasted layer to the Difference mode, thus getting the following image.

After opening both 16-bit files inside the ProPhotoRGB color space and pasting the AdobeRGB tagged file as a layer into the ProPhotoRGB tagged image I switched a blending mode of the pasted layer to the Difference mode, thus getting the following image.
click to see a Flickr! of this image
It is granted that the original image does not represent an ideal test subject as it can't contain all of the colors involved. It is, however a real world image, and it does show the actuall application implication of using different profiles when converting RAW images and chosing a workspace.
Now, about the real world application.
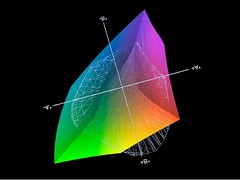
The ProPhotoRGB version of the image and AdobeRGB version of the image were both printed on the Canon i9900 printer, using a custom profile for the paper built with the Eye-One Match 3 from GretagMacbeth hardware and software solution. This is how the custom printer/paper combination profile compares to the AdobeRGB colorspace.
Now, about the real world application.
The ProPhotoRGB version of the image and AdobeRGB version of the image were both printed on the Canon i9900 printer, using a custom profile for the paper built with the Eye-One Match 3 from GretagMacbeth hardware and software solution. This is how the custom printer/paper combination profile compares to the AdobeRGB colorspace.
Shaded shape is AdobeRGB, mesh is a printer profile.
As you can see many of the colors fall out of the range of the AdobeRGB color space. Yet all of this colors are contained within the ProPhotoRGB as it is a much larger color space.
After letting the prints dry I have evaluated them visually under the 5000K light and under the available daylight. The prints were very similar, but the ProPhotoRGB print had slightly "punchier" orange in the color of the building. The AdobeRGB print had more magenta in it and was further from the image rendition on the calibrated CRT screen then the ProPhotoRGB print.
After letting the prints dry I have evaluated them visually under the 5000K light and under the available daylight. The prints were very similar, but the ProPhotoRGB print had slightly "punchier" orange in the color of the building. The AdobeRGB print had more magenta in it and was further from the image rendition on the calibrated CRT screen then the ProPhotoRGB print.
Interestingly enough, when both versions were viewed on the screen there was virtually no difference in the color appearance. This is probably due to the limited capabilities of the CRT color reproduction.
As an added bonus I have printed an 8-bit image version but could not see a quality difference from the 16-bit version with a naked eye. This, however, might be due to the nature of the image subject. When using the difference blending mode procedure described above as well as boost in saturation and brightness of the resulting image the minor difference was descovered. Here is the map of it.

As an added bonus I have printed an 8-bit image version but could not see a quality difference from the 16-bit version with a naked eye. This, however, might be due to the nature of the image subject. When using the difference blending mode procedure described above as well as boost in saturation and brightness of the resulting image the minor difference was descovered. Here is the map of it.
please, click for a Flickr! of the image
So, here you have it. There is an undeniable destinction in theory, that, while having a practical realization, not absolutely critical as far as ink-jet printer concerned. Also, color space proved to be more affecting the final output then the 8-bit versus 16-bit difference.
I will follow up with the instrumental measurment analysis of the different prints of the test image in the near future.
Tuesday, July 12, 2005
Resolving a problem with Palm synchronization using iSync 2.1
Making iSync 2.1 work with PalmOs devices.
This tip applies only to the devices supported by iSync 2.1.
Yesterday I have tried to enable iSync with Palm Treo600. As usual, I have followed all of the procedures, read all of the official apple support articles, yet it would not work.
When I was trying to enable Palm devise from within iSync I would get a message reporting that I have not installed Palm HotSync nor have I used it. Reinstallation of Palm software did not help. So I decided to reinstall the iSync. Which in its turn messed up the whole OS and forced me to the MacOs Tiger Archive and Install and then to Erase and Install.
After all of this it still would not work. However it showed me that I am not of a peril and it is likely OS fault.
Anyway. Here what you should do.
Before enabling Palm Device Syncing in iSync you should, of course, install the latest version of the Palm desktop. Then you need to change permissions for the folder and its content at /Library/Application Support/Palm HotSync. You should ctrl+click the folder and choose Get Info. There make yourself an owner of a folder and allow yourself to read and write. Also opt in to apply the setting to the enclosed files and folders.
After this follow the iSync procedure as recommended by Apple, to enable the Palm Os syncing.
Subscribe to:
Posts (Atom)

